Plotter Cut Films
Which side of the material should face up when I feed it into the plotter?
On most materials, the rule of thumb is to load the material into the cutter so the beginning edge comes over the top of the roll, not from the bottom, however, there are exceptions to this, such as, DecoSparkle®, ThermoFlex® Fashion Patterns, & some colors of GlitterFlex® Ultra.
Make sure that the clear carrier is on the bottom when placing it into your cutter. If it’s hard to tell the carrier side from the material side, you can peel back a small portion of the corner. This will help you see more clearly which side is the carrier and which is the material. If you need help with this, please give us a call.
Basically, make sure you’re cutting into the material and not the carrier!
The material is not sticking to the garment, what do I do?
Most of the time this is caused when there is not enough pressure while heat pressing. Please check the instructions for the particular material- each product has different instructions. Make sure to heat press the garment flat before pressing on the material to iron out any moisture or wrinkles.
Make sure that there are no seams underneath or beside where you are pressing your design. This will cause an uneven pressing surface and affect the quality of the adhesion. Also check the garment you’re pressing on- things like moisture wicking will affect adhesion. If you garment has moisture wicking or some sort of coating, you can help the material adhere better by blotting the area on the garment you’ll be pressing on with rubbing alcohol.
If you have done everything correct- pressing at the correct time, temperature, pressure, and peeling at the right temperature- and are still experiencing this issue, here are a few simple steps:
•First, smooth the design back down. Repress for 50% of the original press time.
•Take a cloth and rub the carrier above the design for 5-7 seconds, especially around the edges.
•Peel off the carrier from a different corner when it has reached the specified peel temperature.
How accurate are the color swatches on the website?
Pretty accurate! We ensure that every color looks as close as possible to how it looks in real life. Please keep in mind, however, each computer screen will show color a little differently so we can’t guarantee a 100% match. To ensure the color is exactly what you need, consult your Product Color Guide. If you need one, request one here!
I need a Pantone match (or PMS) for a job I’m doing.
Please click HERE to get a PDF chart of the approximate Pantone numbers for our most popular ThermoFlex Plus materials. Please click HERE for matches in other ThermoFlex materials.
I need color palettes for Adobe or Corel. Where can I find those?
Please click here for our color palette download page. Most of our product lines have palettes available. Please note these are as close as an approximation as possible- to ensure the color is exactly what you need, consult your Product Color Guide. If you need one, request one here!
The material is not weeding right, what do I do?
Please see “Cut Tech Questions” below!
There are bands of white going horizontally through the printed design. What should I do?
This is referred to as ‘banding’. This problem is generally caused by clogged or dirty print heads. Check your printer manual for instructions on how to do a head cleaning. If you have performed the most powerful cleaning possible and are still having banding issues, contact your printer manufacturer.
There is a great deal of color shift in the printed design. What should I do?
Either one of the print heads is completely clogged or one color is out of ink. If all of your ink levels are good, you may need to perform a head cleaning on your printer. If doing a light, medium, and strong cleaning does not help contact your printer manufacturer. You may need to get a print head replaced.
There are tiny dots and squiggles of white on the printed design. What should I do?
This problem is caused when there is dust on the printing surface. Keep your printable materials covered while storing to prevent dust build-up on the outside edges. We recommend wiping off the first few feet before printing to avoid this issue.
What color profiles are recommended for your materials?
If you are using a Roland VersaCAMM with VersaWorks software, we have found that the TTRH (MAX Impact Color Management) profile works best with most of our materials. If you are using a different printer or software, contact the machine manufacturer for more information.
The material is not weeding right, what do I do?
Most of the time this has to do with how the material was cut. Before plotting your design, perform test cuts and adjust blade depth and speed accordingly. Click HERE to download an infographic concerning what to look for in a test cut for the perfectly plotted design every time.
If the blade is not connecting the lines in the design, the blade offset degree should be adjusted on the plotter to make the edges of the design join properly. When doing a test cut, make sure the machine is cutting 90° angles in the outer box, and depending on your cutter, you will have either a circle or a triangle inside the square.
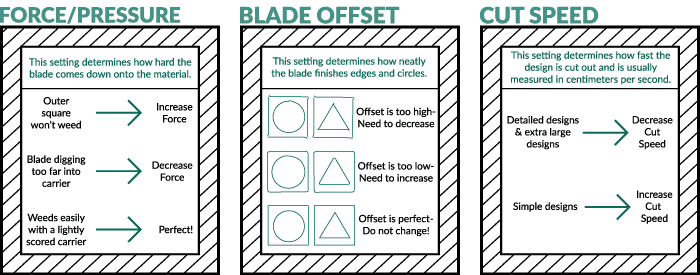
How do I determine the correct blade depth for the plotter?
A good cut is when the blade comes completely through the material and makes a faint score on the carrier. If it is cutting into the carrier deep enough to be felt on the other side, lessen the depth and do another test cut. If it is not cutting deep enough to weed easily, increase the blade down force and test again.
What degree of blades should I use for different materials?
A 45 degree blade works best for most of our materials. We do recommend using a 60 degree blade for our thicker materials. This includes: Dimension™, DecoFilm®, Reflection Protection™, and any other thick material.